

How to Plant Mimosa from Seeds: A Comprehensive Guide
Are you looking to add a touch of elegance and beauty to your garden or landscape? Look no further than the Mimosa tree. With its delicate fern-like leaves, vibrant pink puffball flowers, and graceful form, the Mimosa tree (Albizia julibrissin) is a stunning addition to any outdoor space. While you can purchase young Mimosa trees from nurseries, there is something truly rewarding about growing them from seeds.
In this comprehensive guide, we will take you through the step-by-step process of planting Mimosa from seeds. From understanding the characteristics of the Mimosa tree to collecting and preparing the seeds, and then to sowing and caring for the seedlings, we will leave no stone unturned. By the end of this blog post, you will have all the knowledge and confidence you need to successfully grow Mimosa trees from seeds.
Understanding the Mimosa Tree

The Mimosa tree, scientifically known as Albizia julibrissin, is a captivating and ornamental tree that captivates with its graceful appearance and delicate foliage. Native to Asia, this tree has gained popularity worldwide for its beauty and adaptability. Understanding the characteristics and requirements of the Mimosa tree is crucial before embarking on the journey of growing it from seeds.
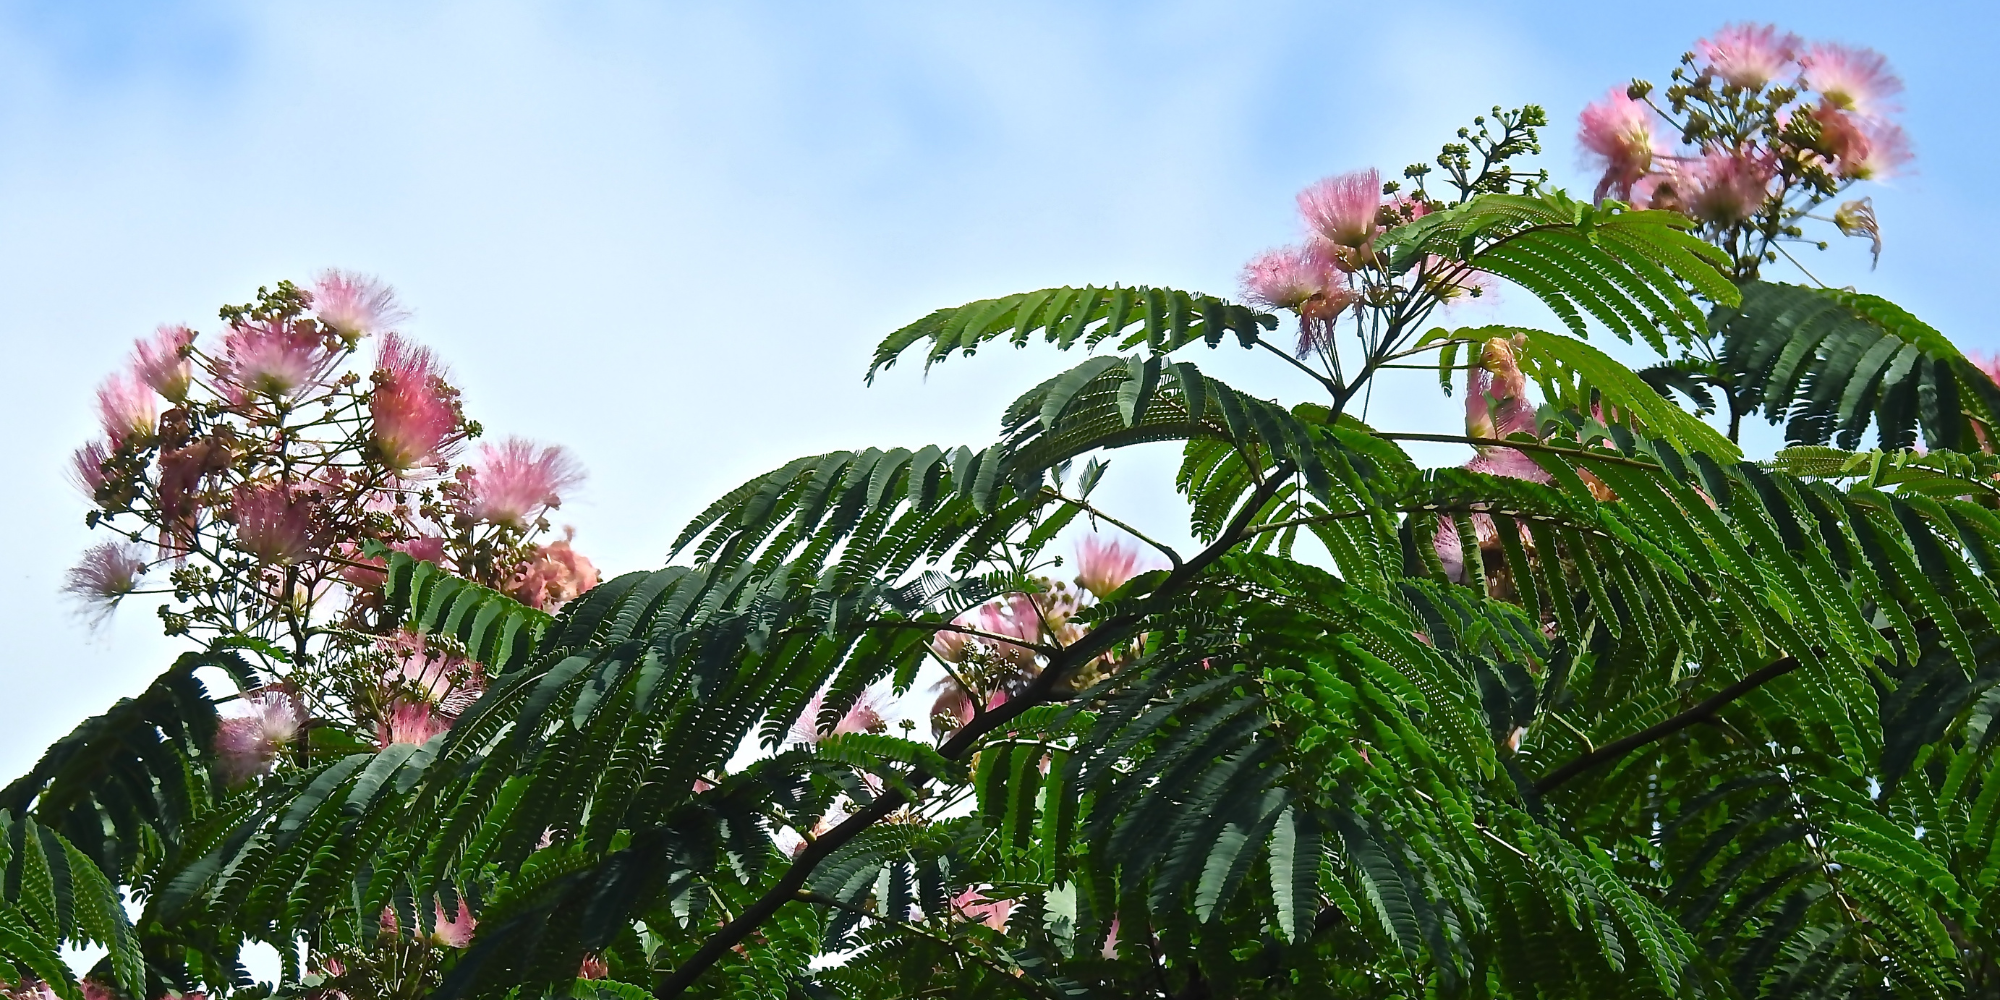
The Mimosa tree is a deciduous tree that can reach heights of up to 40 feet, making it an ideal choice for creating shade in your garden or landscape. Its crown is wide and spreading, providing not only respite from the sun but also a stunning visual display. The most distinctive feature of the Mimosa tree is its fern-like leaves, which are bi-pinnately compound and give the tree an airy and delicate appearance.
Mimosa trees are known for their vibrant and eye-catching flowers. The puffball-shaped flowers bloom in clusters and come in various shades of pink, ranging from light pink to deep magenta. These flowers not only add a pop of color to your outdoor space but also attract pollinators like bees and butterflies, making your garden a haven for wildlife.
When it comes to selecting a suitable species of Mimosa tree for cultivation, it's important to consider your local climate and growing conditions. While the Albizia julibrissin species is the most common and widely cultivated, there are other species such as Albizia lebbeck and Albizia saman that may be better suited to specific climates and regions.
Mimosa trees are adaptable and can tolerate a range of soil types, although they prefer well-drained soil. They thrive in areas with full sun exposure, but they can also tolerate partial shade. When choosing a location for planting your Mimosa tree, keep in mind its potential height and spread, ensuring that it has enough space to grow without crowding other plants or structures.
Aside from its aesthetic appeal, the Mimosa tree also serves practical purposes in landscaping and gardening. Its wide canopy provides shade, making it an excellent choice for creating sheltered outdoor seating areas or protecting delicate plants from intense sunlight. Additionally, the Mimosa tree's extensive root system helps prevent soil erosion, making it beneficial for stabilizing slopes or embankments.
In conclusion, understanding the characteristics and requirements of the Mimosa tree is essential before embarking on the journey of growing it from seeds. With its graceful form, delicate foliage, and vibrant flowers, the Mimosa tree is a stunning addition to any garden or landscape. By selecting the appropriate species, providing the ideal growing conditions, and appreciating its practical benefits, you can successfully cultivate and enjoy the beauty of the Mimosa tree in your own outdoor space.
Collecting and Preparing Mimosa Seeds
To embark on the journey of growing Mimosa trees from seeds, the first step is to collect the seeds and ensure their viability. The Mimosa tree produces long, slender seed pods that resemble pea pods. As the pods mature, they turn brown and dry out, indicating that the seeds are ready for harvesting. It's important to wait until the pods are fully mature before collecting the seeds to ensure optimal germination rates.
Harvesting Mimosa seeds is a straightforward process. Simply inspect the tree for mature seed pods and gently remove them from the branches. Place the pods in a container or bag that allows for air circulation to prevent moisture buildup and subsequent mold or fungal growth. Be sure to handle the pods with care to avoid damaging the seeds inside.
Once you have collected the Mimosa seeds, the next step is to prepare them for planting. This involves cleaning the seeds and removing any debris or pod remnants. Gently rub the seeds between your fingers or use a sieve to separate them from the pod remnants. This allows for better air circulation and reduces the risk of fungal or bacterial infections.
In some cases, Mimosa seeds have hard coats that may require scarification to enhance germination. Scarification involves nicking or scraping the seed coat to allow moisture to penetrate and initiate the germination process. This can be done by gently filing the seed coat with a nail file or using sandpaper to create small abrasions.
Another technique that can improve germination rates is stratification. This process mimics the natural winter dormancy period that Mimosa seeds would experience in their native habitat. To stratify the seeds, place them in a damp paper towel or a sealable plastic bag with a moistened substrate such as peat moss or vermiculite. Place the bag in the refrigerator for a period of 4 to 6 weeks. This cold treatment breaks seed dormancy and prepares the seeds for germination.
After scarification and stratification, or if the seeds do not require these treatments, it's important to store the Mimosa seeds properly until you are ready to plant them. Store the cleaned and prepared seeds in a cool, dry place away from direct sunlight. Using airtight containers or resealable bags can help maintain their viability for a longer period.
In summary, collecting and preparing Mimosa seeds is a crucial step in the process of growing Mimosa trees from seeds. Harvesting mature seed pods, cleaning the seeds, and considering scarification or stratification techniques can significantly improve the germination rates. Proper storage ensures the seeds remain viable until it's time to sow them. By following these steps, you are one step closer to successfully growing your own Mimosa trees from seeds.
Planting Mimosa Seeds
Now that you have collected and prepared your Mimosa seeds, it's time to move on to the exciting step of planting them. Proper planting techniques and suitable growing conditions will greatly contribute to the success of your Mimosa seedlings. Whether you choose to sow the seeds directly in the ground or start them indoors, careful consideration of the planting process is essential.
Choosing the Right Location
Before planting your Mimosa seeds, carefully select a suitable location in your garden or landscape. Mimosa trees thrive in areas with full sun exposure, so choose a spot that receives at least six hours of direct sunlight per day. This will ensure optimal growth and encourage the tree to develop its characteristic shape and vibrant flowers.
In addition to sunlight, the Mimosa tree also requires well-drained soil. Avoid areas prone to waterlogging or areas with compacted soil. If your soil is heavy or clay-like, consider amending it with organic matter such as compost or well-rotted manure to improve its drainage and fertility.
Sowing Mimosa Seeds
Direct Sowing in the Ground
If you prefer to sow your Mimosa seeds directly in the ground, it's important to prepare the soil beforehand. Loosen the soil to a depth of about 12 inches (30 cm) using a garden fork or tiller. Remove any weeds or debris that may hinder the germination and growth of your seedlings.
Create small holes or furrows in the prepared soil, spacing them about 2 to 3 feet (60 to 90 cm) apart. The exact spacing may vary depending on the species and expected size of your Mimosa tree. Place the seeds in the holes or furrows, covering them with a thin layer of soil. Gently firm down the soil to ensure good seed-to-soil contact.
Starting Seeds Indoors
If you choose to start your Mimosa seeds indoors, you can give them a head start by providing optimal growing conditions. Fill seed trays or small pots with a well-draining potting mix. Plant the seeds at a depth of about 1/4 to 1/2 inch (0.6 to 1.3 cm), covering them lightly with soil.
To improve germination rates, consider placing the seed trays or pots in a warm location with a consistent temperature of around 70 to 80°F (21 to 27°C). You can also provide bottom heat by using a seedling heat mat. Keep the soil moist but not waterlogged, using a spray bottle or misting system to avoid disturbing the seeds.
Watering and Fertilizing Requirements
Proper watering is essential for the successful germination and early growth of your Mimosa seedlings. Keep the soil consistently moist but not saturated. Avoid overwatering, as this can lead to root rot and other fungal diseases. Regularly monitor the moisture level of the soil and adjust your watering accordingly.
During the early stages of growth, Mimosa seedlings do not require heavy fertilization. However, you can provide a balanced liquid fertilizer diluted to half strength once the seedlings have developed their first set of true leaves. This will provide them with the necessary nutrients for healthy growth. After the seedlings have been transplanted into larger pots or the garden, you can gradually increase the frequency and strength of the fertilizer application.
In conclusion, planting Mimosa seeds involves selecting the right location, whether it is in the ground or indoors, and providing the necessary care and attention to ensure successful germination and growth. By following these planting guidelines and providing adequate watering and fertilization, you are setting the stage for your Mimosa seeds to develop into beautiful and thriving trees.
Caring for Mimosa Seedlings
Once your Mimosa seeds have germinated and the seedlings have emerged, it is crucial to provide them with proper care to ensure healthy growth and development. Mimosa seedlings are delicate and require specific conditions to thrive. From providing adequate sunlight and temperature to protecting them from pests and diseases, here are some essential tips for caring for your Mimosa seedlings.
Providing Proper Sunlight and Temperature
Mimosa seedlings require bright sunlight to grow into healthy trees. Place them in a location that receives at least six hours of direct sunlight per day. If you are growing them indoors, consider placing them near a south-facing window or under grow lights that provide sufficient light intensity.
Maintaining the correct temperature is also crucial for the growth of Mimosa seedlings. They prefer temperatures between 65 and 75°F (18 to 24°C). Avoid exposing them to extreme temperature fluctuations or cold drafts, as this can stress the young plants. If necessary, use a small fan to provide gentle air circulation and prevent the development of fungal diseases.
Protecting from Pests and Diseases
Mimosa seedlings are susceptible to certain pests and diseases that can hinder their growth. Aphids, caterpillars, and spider mites are common pests that may infest your seedlings. Regularly inspect the plants for any signs of pest activity, such as distorted leaves, webbing, or visible insects. If pests are present, use organic insecticides or employ natural pest control methods to manage the infestation.
Additionally, be vigilant for signs of diseases such as powdery mildew or root rot. These diseases can be caused by excessive moisture, poor air circulation, or fungal spores present in the soil. To prevent these issues, avoid overwatering your seedlings and ensure proper drainage. If signs of disease appear, remove affected parts of the plant and treat with appropriate fungicides, if necessary.
Transplanting Mimosa Seedlings
As your Mimosa seedlings grow, they will eventually outgrow their initial containers or seed trays. Transplanting them into larger pots or directly into the garden is a crucial step in their development. When transplanting, be gentle to avoid damaging the fragile roots of the seedlings.
For container transplants, choose pots that provide ample space for root growth. Fill the pots with well-draining potting mix and create a hole large enough to accommodate the root ball of the seedling. Carefully remove the seedling from its original container, taking care not to disturb the roots. Place the seedling in the hole, ensuring it is at the same depth as it was in its previous container. Fill the remaining space with soil, gently firming it down to secure the seedling in place.
If transplanting directly into the garden, prepare the soil by loosening it and removing any weeds or debris. Dig a hole slightly larger than the root ball of the seedling and place it in the hole at the same depth as it was in its original container. Backfill the hole with soil, gently firming it down around the seedling to eliminate any air pockets.
Maintenance Tips for Healthy Growth
To promote healthy growth and development, there are a few maintenance tips to keep in mind. Firstly, ensure that your Mimosa seedlings receive adequate water. While they prefer consistently moist soil, be careful not to overwater, as this can lead to root rot. Monitor the moisture level of the soil and adjust your watering schedule accordingly.
Regularly inspect your seedlings for any signs of stress or nutrient deficiencies. Yellowing or discolored leaves may indicate nutrient imbalances, and prompt action should be taken to address these issues. Applying a balanced fertilizer formulated for young plants can help provide the necessary nutrients for healthy growth.
Lastly, consider pruning and shaping your Mimosa seedlings to encourage their desired form and aesthetics. Pruning can be done to remove dead or damaged branches, improve air circulation, and shape the tree's overall structure. Aim to prune in late winter or early spring before new growth emerges.
In conclusion, caring for Mimosa seedlings requires providing them with proper sunlight and temperature, protecting them from pests and diseases, and ensuring they have adequate water and nutrients. By following these care tips, you can nurture your Mimosa seedlings into healthy and vibrant trees that will bring beauty and joy to your garden or landscape.
Pruning and Shaping Mimosa Trees
Pruning and shaping Mimosa trees is an important aspect of their care and maintenance. By selectively removing branches and shaping the tree's form, you can enhance its overall aesthetics, promote healthy growth, and maintain a manageable size. Understanding the best practices for pruning and shaping will help you achieve the desired look for your Mimosa tree.
Understanding the Pruning Process
Pruning is the process of removing specific parts of a plant, such as branches or foliage, to improve its overall health, structure, and appearance. When it comes to Mimosa trees, pruning plays a crucial role in controlling their size, shaping their form, and promoting proper air circulation within the canopy.
The ideal time to prune Mimosa trees is during late winter or early spring, before new growth emerges. This dormant period allows the tree to recover from pruning stress and encourages healthy regrowth in the upcoming growing season. Avoid pruning during the active growing season, as this can disrupt the tree's natural growth cycle and potentially weaken the tree.
Tools Needed for Pruning
To effectively prune your Mimosa tree, it is important to have the right tools on hand. Here are some common tools used for pruning:
1. Pruning Shears
Also known as hand pruners, these are used for cutting smaller branches and twigs. Choose a sharp and sturdy pair of shears that can easily cut through the branches without causing damage.
2. Pruning Saw
A pruning saw is necessary for cutting larger branches that are too thick for pruning shears. Look for a saw with a curved blade and sharp teeth for efficient and clean cuts.
3. Loppers
Loppers are a larger version of pruning shears, designed for cutting branches with a diameter of up to 2 inches (5 cm). They provide more leverage and reach than hand pruners, making them ideal for removing larger branches.
4. Pole Pruners
If you have taller Mimosa trees, a pole pruner can be useful for reaching higher branches without the need for a ladder. These pruners have an extendable pole with a cutting mechanism at the end.
5. Safety Gear
When pruning trees, it's important to protect yourself. Wear gloves to protect your hands from thorns and sharp edges, safety goggles to shield your eyes from flying debris, and a sturdy pair of boots for stability.
Basic Pruning Techniques
When pruning your Mimosa tree, it's important to follow some basic techniques to ensure healthy and successful results.
1. Remove Dead or Diseased Branches
Start by removing any dead, damaged, or diseased branches. These branches not only detract from the tree's appearance but can also pose a risk to the overall health of the tree. Use pruning shears or a pruning saw to make clean cuts just outside the branch collar, which is the swollen area where the branch meets the trunk.
2. Thin Out the Canopy
Thinning out the canopy involves selectively removing some of the inner branches to improve air circulation and reduce the risk of fungal diseases. This allows sunlight to penetrate the tree's interior, promoting better overall growth. Use pruning shears or loppers to selectively remove branches that are crossing, rubbing against each other, or growing towards the center of the tree.
3. Maintain the Desired Shape
If you have a specific shape or form in mind for your Mimosa tree, regular pruning can help maintain it. Whether you prefer a more compact tree or a more open and spreading form, selectively prune branches to achieve the desired shape. Take care not to remove too much foliage at once, as this can stress the tree. Instead, prune gradually over multiple seasons to achieve the desired shape.
4. Limit Height and Spread
Mimosa trees have a tendency to grow rapidly and can become quite large if left unchecked. If you want to limit the height and spread of your tree, prune the uppermost branches to reduce its overall size. This will help maintain a more manageable size and prevent the tree from overpowering your garden or landscape.
Considerations for Flowering
One important consideration when pruning Mimosa trees is their flowering period. Mimosa trees typically flower on new growth, so pruning during the dormant season should not significantly impact their blooming. However, if you prune during the active growing season, you may remove potential flower buds and reduce the tree's flowering display for that year. Take this into account when planning your pruning schedule.
Troubleshooting Common Issues
While growing Mimosa trees from seeds can be a rewarding experience, it is not without its challenges. Various issues can arise during the germination, growth, and maintenance stages. Being able to recognize and address these common problems will help you ensure the health and vitality of your Mimosa trees.
Recognizing and Addressing Germination Issues
One of the initial challenges you may encounter when planting Mimosa seeds is poor germination. Several factors can contribute to this issue. Firstly, ensure that you are using fresh and viable seeds. Mimosa seeds have a limited viability, so it's best to use seeds that have been harvested within the last year. If you are uncertain about the viability of your seeds, you can perform a germination test by planting a small batch of seeds in a separate container to check their germination rate.
Another factor that affects germination is the depth at which the seeds are planted. If the seeds are buried too deep, they may struggle to emerge from the soil. Conversely, if the seeds are planted too shallow, they may dry out or be exposed to excessive sunlight. Aim to plant the seeds at a depth of about 1/4 to 1/2 inch (0.6 to 1.3 cm) to provide them with the optimal conditions for germination.
In some cases, scarification or stratification may be necessary to improve germination rates. Scarification helps to break the seed coat and allow moisture to penetrate, while stratification mimics the natural winter conditions that stimulate germination. If you have not performed these treatments and are experiencing low germination rates, consider trying them for subsequent batches of seeds.
Dealing with Pests and Diseases
Mimosa trees are generally hardy and resistant to pests and diseases. However, they can still be susceptible to certain issues that can impact their health. Common pests that may affect Mimosa trees include aphids, caterpillars, and spider mites. These pests can cause damage to the leaves and hinder the tree's growth. Regularly inspect your trees for any signs of pest activity and take appropriate measures to manage the infestation.
In terms of diseases, Mimosa trees can be prone to powdery mildew, a fungal infection that appears as a white powdery coating on the leaves. This can occur in humid or poorly ventilated environments. To prevent powdery mildew, ensure adequate air circulation around the tree and avoid overhead watering. If the infection is severe, you can apply fungicides specifically formulated for powdery mildew control.
Nutrient Deficiencies and Corrective Measures
Nutrient deficiencies can manifest in the form of yellowing or discolored leaves, stunted growth, or poor overall health. While Mimosa trees are generally adaptable and can tolerate a range of soil conditions, deficiencies can occur if the soil lacks certain essential nutrients. The most common nutrient deficiencies in Mimosa trees are nitrogen, phosphorus, and potassium.
To address nutrient deficiencies, it's important to first identify the specific nutrient lacking in the soil. This can be determined through soil testing, which will provide you with valuable information about the nutrient levels and pH balance of your soil. Once you know the specific deficiency, you can apply appropriate fertilizers or soil amendments to correct the imbalance. Organic options, such as compost or well-rotted manure, can also be used to enhance soil fertility and provide a slow release of nutrients.
Preventing and Managing Environmental Stress Factors
Environmental stress factors can impact the overall health and vigor of your Mimosa trees. These factors include extreme temperatures, drought, excessive rainfall, and poor soil conditions. While Mimosa trees are generally resilient, they can still suffer from stress if not provided with suitable growing conditions.
To prevent stress, ensure that your Mimosa trees are planted in well-drained soil and are watered appropriately. Avoid overwatering, as this can lead to root rot and other fungal diseases. Similarly, during periods of drought, it is important to provide supplemental irrigation to keep the soil moist.
Extreme temperatures can also stress Mimosa trees. In colder regions, protect young trees from frost by covering them with frost blankets or burlap. In hotter regions, provide shade during the hottest parts of the day to prevent sunburn or heat stress.
Harvesting and Propagating Mimosa Trees
After putting in the time and effort to grow Mimosa trees from seeds, you have the opportunity to enjoy the fruits of your labor and even expand your collection through harvesting and propagation. Harvesting Mimosa seeds and learning how to propagate them will allow you to continue growing these beautiful trees and share their beauty with others.
Signs of Maturity and Readiness for Harvesting
Mimosa trees typically produce seed pods after flowering, and these pods mature over time. To determine if the seed pods are ready for harvesting, look for signs of maturity. The pods should be fully developed, turning from green to brown and becoming dry and brittle. You may notice that the pods start to split open, exposing the seeds inside.
Timing is crucial when harvesting Mimosa seeds. If you harvest the pods too early, the seeds may not be fully developed and may not germinate successfully. Conversely, if you wait too long, the pods may split open on their own, dispersing the seeds before you have the chance to collect them. Regularly check the pods for signs of maturity and harvest them at the optimal time.
Harvesting and Storing Seeds
To harvest Mimosa seeds, gently pluck the mature seed pods from the tree. You can use your fingers or small pruners to remove the pods. Place the pods in a container or bag, keeping them separate from any debris or remnants of the pod. This will help maintain the viability of the seeds and prevent them from being damaged during storage.
After harvesting the seed pods, it's important to properly store the Mimosa seeds to ensure their viability for future use. Store the seeds in a cool, dry, and dark location. Airtight containers or resealable bags can help maintain the seeds' freshness and protect them from moisture and pests. Label the containers with the date of harvest and any additional information, such as the Mimosa species or specific location where the seeds were collected.
Propagation Techniques for Expanding Your Collection
In addition to harvesting and storing seeds, you can also propagate Mimosa trees through other methods to expand your collection or share them with fellow gardening enthusiasts. Here are two common propagation techniques: stem cuttings and air layering.
Stem Cuttings
Stem cuttings are a popular method for propagating Mimosa trees. Choose a healthy, mature branch and make a clean cut just below a leaf node. The cutting should be approximately 6 to 8 inches (15 to 20 cm) long. Remove the lower leaves, leaving only a few at the top. Dip the cut end in a rooting hormone to encourage root development, then plant the cutting in a container filled with a well-draining potting mix. Place the container in a warm location with indirect sunlight and keep the soil consistently moist. In a few weeks, roots should begin to develop, indicating successful propagation.
Air Layering
Air layering is another propagation technique that can be used for Mimosa trees. This method involves creating a wound on a branch, encouraging the growth of roots at the wound site. Select a healthy branch and make a small incision or remove a small strip of bark, about 1 inch (2.5 cm) wide, from the chosen spot. Apply a rooting hormone to the exposed area, then wrap it with damp sphagnum moss or a similar rooting medium. Cover the moss with plastic wrap to retain moisture and secure it with twine or a rubber band. Over time, roots will form at the wound site. Once the roots are well-developed, carefully cut the branch below the air layer and plant it in a container or directly in the ground.
Continuing the Mimosa Growing Journey
Harvesting and propagating Mimosa trees not only allows you to create a diverse collection but also provides the opportunity to share the beauty of these trees with others. By harvesting seeds at the right time and storing them properly, you can ensure a supply of viable seeds for future propagation. Additionally, exploring propagation techniques like stem cuttings and air layering gives you the ability to create new trees and expand your Mimosa garden.
Remember to document your experiences and successes with growing Mimosa trees. Share your knowledge with fellow gardeners, participate in gardening forums, or even consider joining local horticultural societies. By sharing your passion and experiences, you can inspire others to embark on their own Mimosa growing journey.
In conclusion, harvesting and propagating Mimosa trees is a rewarding process that allows you to continue growing these beautiful trees and share their splendor with others. By recognizing the signs of maturity in seed pods, properly harvesting and storing seeds, and exploring propagation techniques, you can continue to expand your collection and immerse yourself in the joy of growing Mimosa trees.
Conclusion
Congratulations! You have reached the end of this comprehensive guide on how to plant Mimosa from seeds. Throughout this journey, we have explored the characteristics of the Mimosa tree, learned how to collect and prepare Mimosa seeds, and discovered the best techniques for planting and caring for Mimosa seedlings. We have also discussed troubleshooting common issues, the importance of pruning and shaping, and the exciting processes of harvesting seeds and propagating Mimosa trees.
By now, you should have a solid understanding of the steps involved in growing Mimosa trees from seeds. From selecting the right location and preparing the soil to sowing the seeds and providing proper care, you have learned the essential techniques for successful cultivation. You are equipped with the knowledge to recognize and address common challenges such as germination issues, pests, diseases, nutrient deficiencies, and environmental stress factors. Additionally, you have gained insights into the art of pruning and shaping Mimosa trees, allowing you to maintain their aesthetics and ensure healthy growth.
Remember, growing Mimosa trees from seeds is a journey that requires patience, dedication, and careful attention. It may take some time for your seedlings to develop into mature trees, but the rewards will be worth it. The delicate fern-like leaves, vibrant pink puffball flowers, and graceful form of the Mimosa tree will bring beauty and elegance to your garden or landscape.
As you continue your Mimosa growing journey, don't forget to document your experiences, share your knowledge with others, and seek inspiration from fellow gardeners. Gardening is not only a personal endeavor but also a communal one, where we can connect, learn, and grow together.
So, grab your gardening tools, gather your Mimosa seeds, and embark on this exciting adventure of planting Mimosa from seeds. With the information and tips provided in this guide, you are well-equipped to nurture and enjoy the beauty of these remarkable trees.
Happy planting and may your Mimosa trees flourish in all their splendor!


